Most American builders install windows flat on the exterior sheathing (“outies”), although in some exterior-insulation retrofits, replacement windows are installed closer to the interior surface of the wall (“innies”). Even when builders follow window-manufacturer instructions, though, innies and outies still leak. The blame is often directed at manufacturers, but I’m fairly convinced that most leaks are caused by air-sealing and flashing errors, not manufacturing defects. My firm reached that conclusion after comparing the installation details used for typical flanged windows with the details used for commercial curtain-wall and European tilt-turn windows. Based on that research, we came up with an “in-betweenie” window-installation method.
Commercial high-rise curtain-wall systems typically rely on pressure management to keep water from entering the building. The insulated glazing units are fitted against a flexible gasket at the interior face of the glazing and are held in place with a glazing cap. The system’s critical element is the air seal created by the interior glazing gasket; these windows are tight on the inside and leaky on the outside. When a strong wind blows, air pressure builds inside the chambers of the frame around the window, forcing water out through drainage channels created for that purpose.
European tilt-turn windows are installed according to the same principles. Unlike European windows, however, flanged windows attempt to put the water seal on the outside face of the window flange. Manufacturers, though, usually instruct builders to leave an outward drainage path at the sill. This path bypasses the air-and-water seal. Furthermore, there often is a ring of air-permeable and water-permeable fiberglass stuffed in the gap between the window unit and the wall: tight on the outside, leaky on the inside. When strong pressure builds up against the window, the building actively sucks water inside the rough opening through any gap, pulling water into the building.
If you’re lucky and have a builder who is careful and up to date, the window will be sealed at the perimeter with expanding spray foam, which works OK as an interior air-and-water seal. During blower-door tests, though, we regularly see air leakage through brand-new expanding spray foam. (The air seems to travel right through the “folds” in the foam—pockets of foam that don’t quite expand completely before they skin over.) These leaks occur even before the lumber dries and shrinks away from the cured spray foam. We’re convinced that water travels right through most spray foam installations around windows, especially under the pressurized conditions of a Maine nor’easter.
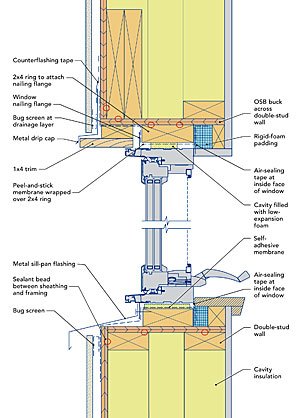
A 2×4 ring lines the oversize rough opening
The rough opening should be framed 3-in. oversize in both dimensions to leave room for a 2×4 “ring” that accommodates the window flanges. It’s essential to create a tight air seal at the interior of the window with high-quality tape or expanding foam and caulk. Include caulk at all the indicated locations to maintain the integrity of the home’s air barrier. To leave a clear exit path for any water that leaks past the window flanges, don’t install any sealant or spray foam under the metal sill flashing.
Four rules for window installation
Sill flashing as a trim detail. Galvanized steel or copper can protect the framing from water intrusion while adding character to the exterior.
We don’t install commercial curtain walls or European windows in our typical residential projects, so we’ve had to develop installation details that adapt proper pressure-management principles to U.S. flanged windows. For these details, we follow four rules.
1. Protect the head of the window from rain by tucking the window in from the face of the wall. Roof overhangs don’t help much on the coast—water blows sideways, up, and down—and an 18-in. overhang on a taller building doesn’t help the ground-floor windows at all. On a building with 12-in.-thick well-insulated walls, we slide the windows back 3-1⁄2 in. so that every window has an individual built-in overhang right above the window head. That means we install most windows as “in-betweenies” instead of “innies” or “outies.”
2. Treat the window flange as an installation aid only, not as a water or air seal. Expect that water will be able to enter behind the flange during extreme conditions, and always provide a pathway out. Follow the manufacturer’s instructions; your warranty depends on it.
3. Make sure water can’t pool on bare wood and rot the wall. Wrap rough openings properly, with tape or flashing that is lapped top over bottom, and install a sloped sill pan below the window. It’s now part of most window manufacturers’ instructions to place a clapboard or sloped shim at the rough sill, but we still rarely see this recommendation followed until we ask for it. The critical and often-over-looked air-sealing area is at the interior of the sill. If
the window is not shimmed at its sill—the usual situation we see—there needs to be a bead of caulk or a gasket seal at the inside face of the window to prevent water from blowing up under the open exterior window flange, right under the window frame, and into the building.
4. Establish a long-lasting air-and-water seal at the inside face of the window unit, and connect that seal to the rough opening. The best material for creating this seal is a flexible and long-lasting construction tape such as Dow Weathermate or 3M 8067 Flashing Tape, or a European tape such as Siga Rissan or Pro Clima Tescon. The tape will experience consistent temperatures on the interior side of the window; it won’t, however, go through extreme freeze/thaw cycles like exterior tape. It should also remain flexible longer than spray foam. However, this tedious, nonstandard technique for most U.S. builders will likely lead to an upcharge, so we usually have to accept spray foam as our interior air seal. (Fiberglass scraps do not belong in a rough opening.) We insist on a blower-door test to ensure that the air seal around the window was installed properly, and we often make builders come back with caulk to close up the holes they are surprised to find in the spray foam. Our typical non-Passive House airtightness standard for residential work is 1.5 ACH50, but we always give builders the cfm50 number that would allow them to beat the 0.4 ACH50 achieved by one of their competitors. It never hurts to let them know where the bar really sits.
Source: Fine Home Building